A thick, vibrant lawn doesn’t happen by accident. Over time, foot traffic, mowing, and rainfall slowly squeeze the life out of your soil, making it harder for grass to thrive.
This guide is for homeowners and lawn care enthusiasts looking to improve their lawn’s health and appearance. Proper aeration can transform a struggling yard into a lush, resilient landscape.
Lawn aeration offers a straightforward solution—and understanding when and how to aerate your lawn can make the difference between a struggling yard and a standout landscape.
Key Takeaways
- Lawn aeration relieves soil compaction by creating small holes that let air, water, and nutrients reach grass roots directly. It’s one of the fastest ways to revive a thin or tired lawn and restore vigorous growth.
- Cool season grasses like Kentucky bluegrass, fescue, and ryegrass should be aerated in early fall (September through early October), with an optional secondary window in early spring (April). Warm season grasses such as Bermuda, zoysia, and St. Augustine perform best with late spring to early summer aeration (May through June).
- Core aeration is more effective than spike or shoe aerators because it actually removes plugs of soil from the ground, reducing compaction rather than simply squeezing soil sideways.
- Lawns on heavy clay soil or with high traffic from kids, pets, or sports use may need yearly aeration, while lighter-use lawns on loam or sandy soil typically only need it every two to three years.
- This guide provides step-by-step instructions for DIY aeration, post-aeration care including overseeding and fertilizing, and simple tests to determine if your lawn really needs to be aerated this year.
What Is Lawn Aeration?
Aeration involves perforating the soil with small holes to allow air, water, and nutrients to penetrate the grass roots.
Lawn aeration is the process of creating small holes in the lawn surface to relieve compaction and improve the movement of air, water, and nutrients into the root zone. When soil becomes packed down over time, it restricts the space available for roots to grow and limits oxygen exchange essential for healthy turf. Aeration addresses this by opening pathways through the soil surface, allowing water and fertilizer to penetrate where they’re needed most.
Core aeration specifically involves a machine equipped with hollow tines that pull cylindrical soil plugs from the ground, typically two to three inches deep. These plugs are left scattered on the lawn surface, where they gradually break down over one to two weeks with rainfall and mowing, recycling organic matter and beneficial soil microbes back into the turf.
Several mechanical methods exist for aerating lawns:
- Core/Plug aeration: Removes soil plugs using hollow tines; most effective for compacted home lawns
- Spike aeration: Uses solid tines to poke holes without removing soil; less effective on clay
- Slice aeration: Rotating blades cut grooves into the soil; useful for overseeding
- Liquid aeration: Chemical solutions intended to improve soil structure; supplemental only
When aeration improves gas exchange and creates room for root expansion, the results show in your turf. Grass develops deeper, stronger roots that can access water and nutrients more efficiently. This translates to thicker, greener grass with better tolerance to heat, drought, and everyday wear.
Why Your Lawn Needs Aeration
Symptoms of Compaction
Many urban and suburban lawns slowly compact over time from traffic, regular mowing, and the weight of rainfall pressing soil particles together. This gradual compression chokes roots and reduces overall lawn health, often without homeowners realizing the cause of their turf problems.
Common symptoms that signal your lawn may need aeration include:
- Water puddling on the surface after rain instead of soaking in
- Hard soil that resists penetration with a screwdriver or shovel
- Thinning or yellowing patches despite adequate watering
- Shallow root systems that lift easily when tugged
- Heavy thatch layers exceeding half an inch thick
Soil compaction occurs when particles are pressed tightly together, reducing the pore space that normally holds air and allows water to move freely. Without sufficient pore space, roots struggle to expand, and essential oxygen can’t reach grass roots where respiration happens.
How Thatch Affects Your Lawn
Thatch Buildup and Lawn Health
Thatch is the spongy layer of dead and living stems, stolons, and roots that accumulates between the green grass blades and the soil surface. It’s a natural part of lawn biology, but its thickness determines whether it helps or hurts your turf.
A thin layer of thatch up to about half an inch is actually beneficial. It cushions the lawn, retains moisture, and provides some insulation. However, when thatch exceeds three-quarters of an inch, it becomes a barrier that blocks air and water from reaching the soil below.
Aeration helps manage thatch indirectly by improving soil oxygen levels and encouraging the microbial populations that break down organic material. When these beneficial organisms have access to air, they decompose thatch more efficiently—research shows thatch breakdown can accelerate by up to 40% in well-aerated lawns.
To perform a simple thatch test:
- Use a hand trowel to cut out a small plug of turf about three inches deep.
- Measure the brown, spongy layer between the green grass blades and the soil with a ruler.
- If it’s over three-quarters of an inch, aeration should be a priority.
For severe thatch over about one inch, aeration alone may not be sufficient. Specialized tools such as vertical mowers or power rakes may be needed to mechanically remove excess material before aeration can fully benefit the lawn.
Compacted Soil and Traffic Patterns
Compaction is worst in predictable high-traffic areas where repeated pressure squeezes soil particles together. Look for trouble along sidewalks, near playsets, in dog runs, around sports areas, and anywhere mowers or vehicles repeatedly turn.
A simple diagnostic tool is the screwdriver test: after watering your lawn, attempt to push a standard screwdriver into the soil. If it’s very difficult to penetrate beyond one to two inches, the soil is likely compacted and would benefit from core aeration.
Heavy clay soils—common in many post-2000 housing developments where topsoil was removed during construction—compact more easily and may need annual or even twice-yearly aeration. The small particle size of clay leaves little natural pore space compared to loamy or sandy soils.
Even newer sod laid on construction-compacted subsoil often needs aeration within one to two years after installation. The sod may look healthy initially, but roots confined to a thin layer above hard-packed fill soil will eventually struggle.
Key compaction problem areas to monitor:
- Paths worn by pets along fence lines or between gates
- Corners where mowers turn repeatedly
- Areas under swing sets or near basketball hoops
- Spots where kids congregate to play
- Parking areas or edges of driveways
Consider a family lawn with a backyard playset and active dogs running regular paths along the fence line. After annual core aeration each fall, these high-traffic areas show noticeably thicker turf and faster recovery from wear compared to years when aeration was skipped.
When to Aerate Your Lawn
Timing matters significantly when you aerate your lawn. Always schedule aeration during the grass’s active growing season so it can recover quickly from the temporary stress of having cores removed from the turf.
For cool season lawns including Kentucky bluegrass, perennial ryegrass, and tall fescue, early fall is the ideal window—typically September through early October. This gives grass several weeks of favorable growing conditions to fill in before winter dormancy. A secondary opportunity exists in early spring around April, though fall remains preferred because grass competes less with weed germination.
Warm season grasses including Bermuda, zoysia, St. Augustine, and centipede should be aerated in late spring to early summer, roughly May through June. This timing follows green-up when these grasses are actively spreading and can heal quickly.
| Grass Type | Best Aeration Window | Secondary Window |
|---|---|---|
| Cool-season (bluegrass, fescue, ryegrass) | Early fall (September–October) | Early spring (April) |
| Warm-season (Bermuda, zoysia, St. Augustine) | Late spring–early summer (May–June) | None recommended |
Soil moisture matters for successful aeration. Water the lawn one to two days beforehand so the soil is moist enough for tines to penetrate two to three inches, but not muddy or saturated. Dry, hard soil prevents adequate penetration, while wet soil clogs equipment and tears turf.
Avoid aerating during summer heat waves, winter dormancy, prolonged drought, or when the ground is frozen. Recovery will be slow under these stressful conditions, and you may cause more harm than good.
How Often Should You Aerate?
Simple rules of thumb guide aeration frequency based on your lawn’s specific conditions:
- High-traffic clay lawns: Every year
- Moderate-traffic lawns: Every one to two years
- Low-traffic lawns on loamy or sandy soil: Every two to three years
Base your frequency on visual cues rather than just the calendar. If you’re seeing thinning turf, puddling after rain, or soil hardness despite adequate care, it’s time to aerate regardless of when you last did it.
New lawns installed on compacted construction soil often benefit from aeration every year for the first two to three years, then less frequently as soil structure improves through repeated treatment and organic matter accumulation.
Consider recording aeration dates—perhaps noting each September when you treat the lawn—to track how your turf responds over several seasons. This allows you to refine your schedule based on actual results rather than general guidelines.
Regional and Climate Considerations
Climate influences aeration timing significantly across different regions:
- Cool-humid regions (Upper Midwest, Northeast): September aeration is ideal, providing six to eight weeks of fall growth before frost
- Transition zones (Kansas City, St. Louis, Nashville): Both spring and fall windows work, though fall typically avoids weed competition
- Warm coastal regions (Southeast, Gulf Coast): Late spring after full green-up ensures rapid recovery during peak growth
In hot-summer areas, aerating cool-season grass too late in spring can encourage weed germination and stress turf heading into heat. Fall is generally safer, allowing grass to recover without competing against summer weeds.
In mild coastal climates without deep freezes, aeration windows can extend slightly longer, as long as grass is clearly in active growth rather than dormant. Watch for new blade emergence and steady green color as indicators.
Align aeration with other seasonal tasks like overseeding and fall fertilization in Virginia to maximize each maintenance window. Combining these practices after aeration takes advantage of open soil contact and favorable growing conditions.
Types of Lawn Aeration Methods
Homeowners can choose between several mechanical and chemical methods for aerating their lawns, each with pros and cons based on soil type, budget, and the degree of compaction present.
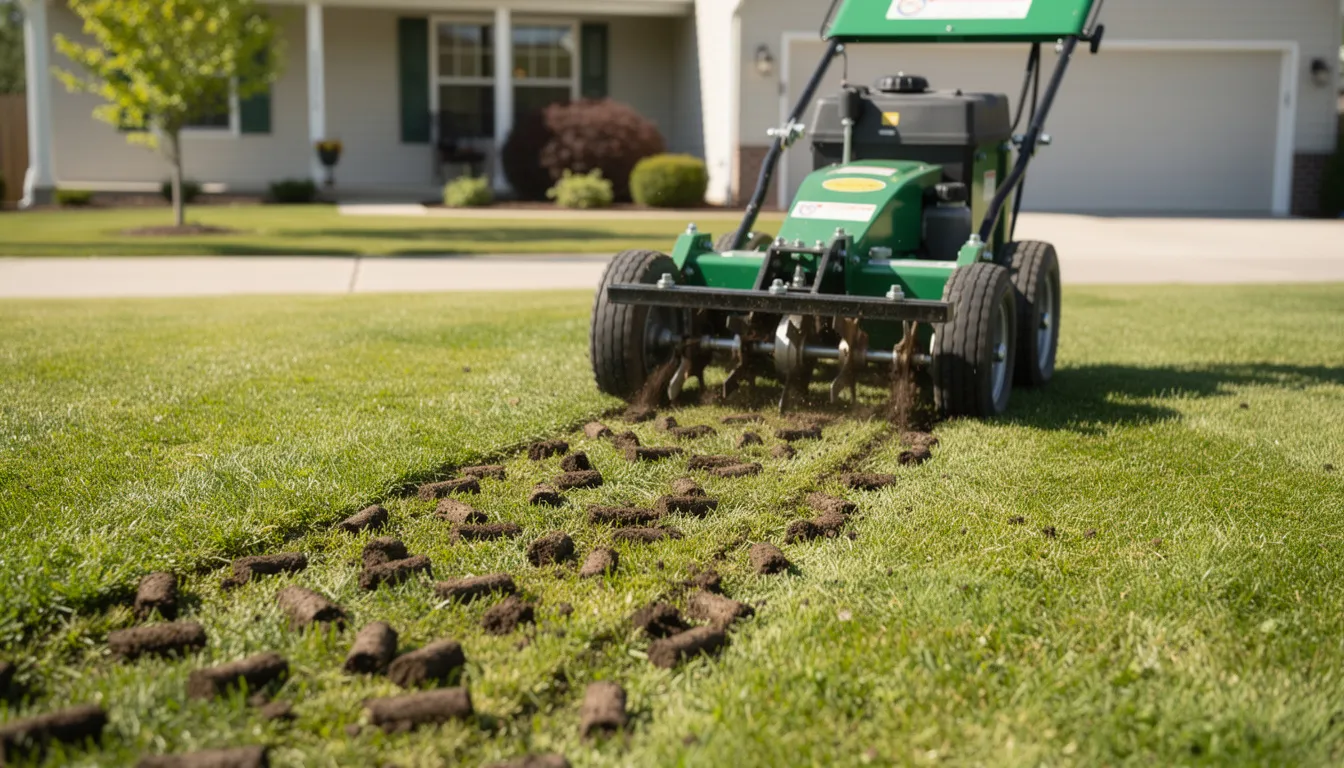
For most compacted home lawns, core aeration performed with a mechanical aerator is the most effective and widely recommended method. It’s the standard approach used by lawn service professionals and sports field managers because it actually removes soil rather than just poking holes.
Aeration Methods Comparison
| Method | How It Works | Best For | Pros | Cons |
|---|---|---|---|---|
| Core/Plug Aeration | Removes soil plugs using hollow tines | Compacted home lawns | Most effective for compaction relief | Requires equipment rental or pro help |
| Spike Aeration | Solid tines poke holes without removing soil | Loamy/sandy soils, minor issues | Simple, inexpensive | Can worsen compaction in clay soils |
| Slice Aeration | Rotating blades cut grooves into soil | Overseeding, surface opening | Good for seed-to-soil contact | Less effective for deep compaction |
| Liquid Aeration | Sprayed soil conditioners improve structure | Supplemental, ongoing care | Easy to apply, supports microbes | Not a substitute for mechanical methods |
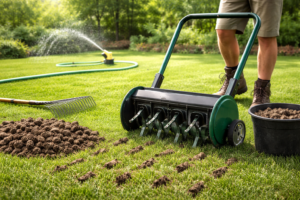
Core or Plug Aeration
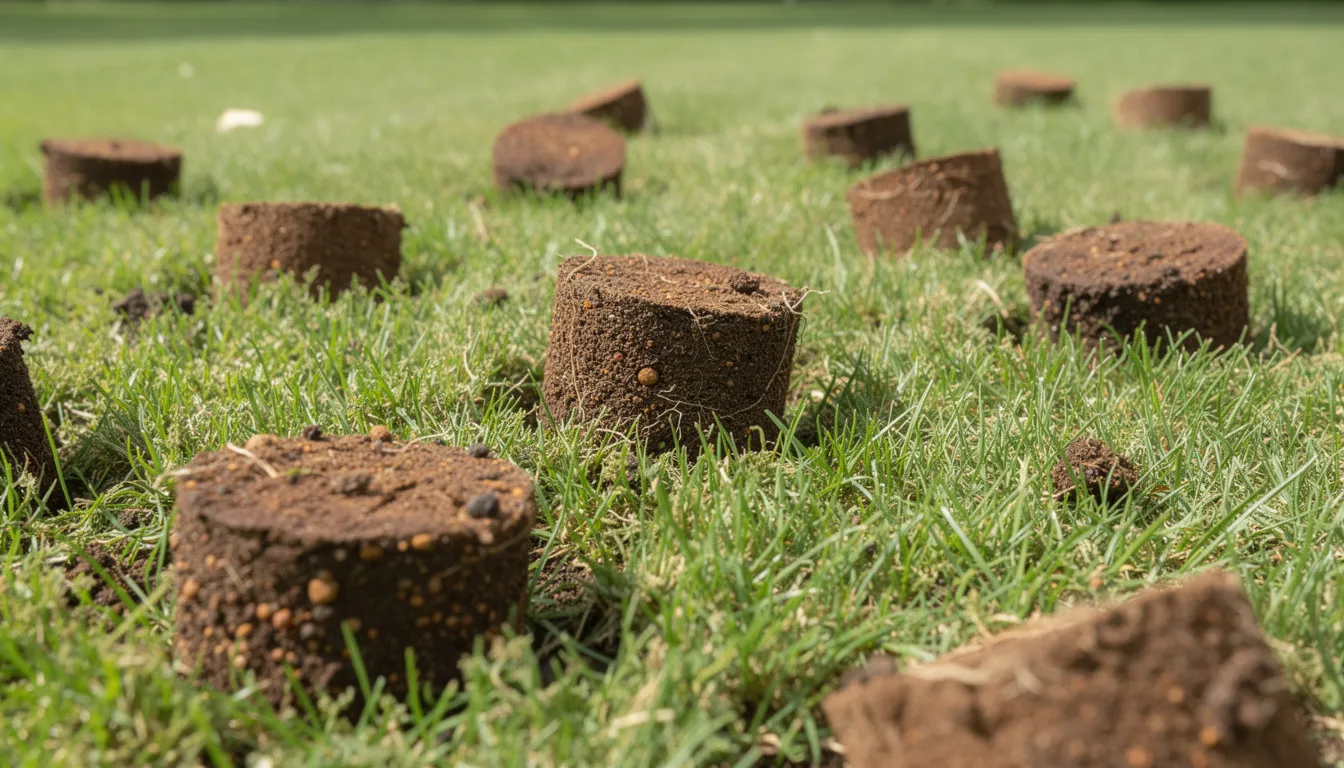
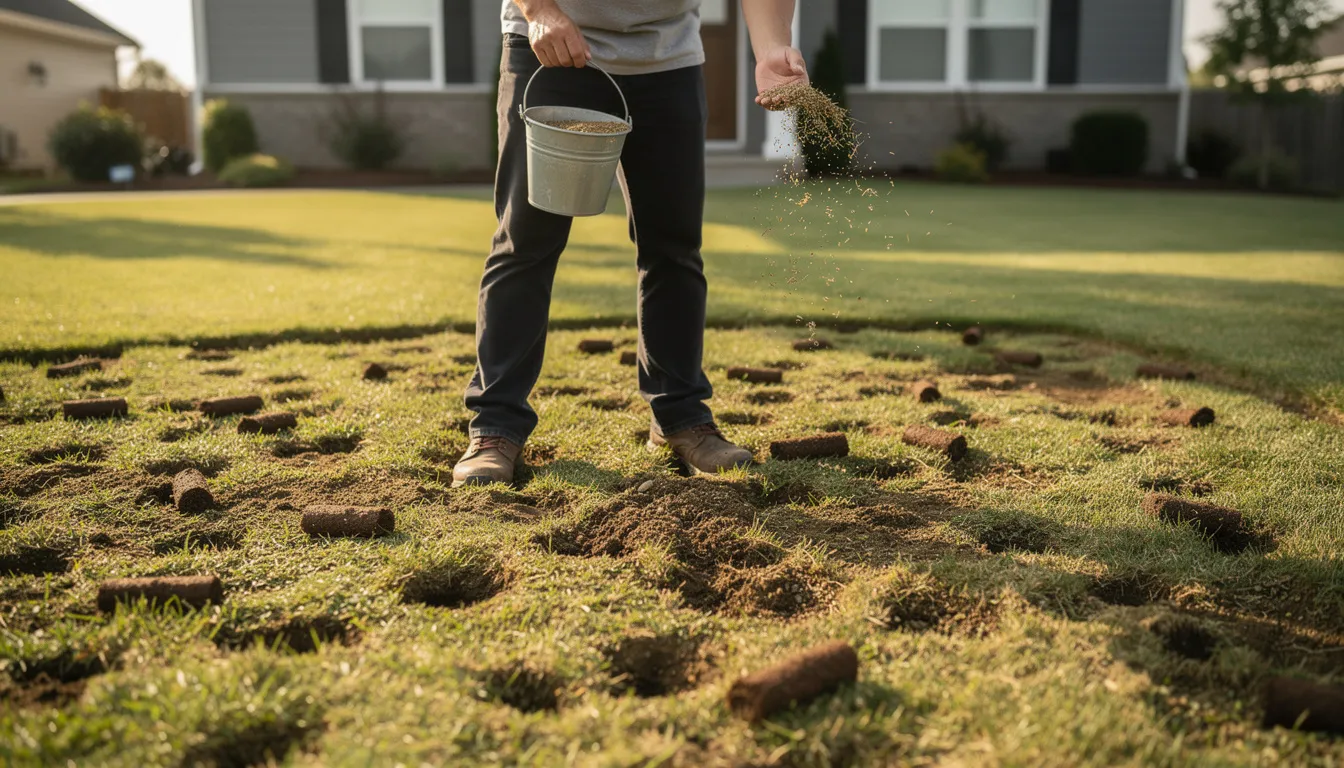
Core aerators use hollow tines to pull cylindrical plugs of soil and thatch from the lawn. These plugs are typically two to three inches deep and about half to three-quarters inch in diameter. The tines extract actual material from the ground, creating open channels that reduce compaction rather than just displacing soil.
After aeration, the lawn looks distinctly different—visible cores are scattered on the surface roughly every two to four inches. These plugs gradually break down with rainfall and mowing over one to two weeks, returning soil and beneficial microbes to the turf.
Removing soil is what makes this method effective. Unlike poking holes, extracting material genuinely reduces the density of compacted soil and creates lasting improvements in pore space for air and water movement.
For best results, target 20 to 40 holes per square foot by making several passes in different directions—north to south, then east to west—over high-traffic or heavily compacted areas.
Core aerators can be rented by the day from local equipment or lawn and garden stores, but many homeowners prefer professional core aeration services for healthier lawns when they want expert handling and optimal results. Sharing a rental with neighbors on the same weekend can lower costs significantly while allowing everyone to treat their properties during the optimal seasonal window.
Spike Aeration
Spike aeration uses solid tines or spikes—found on manual aerator shoes or drum rollers—that punch holes in the lawn without removing soil. While this creates surface openings, the process has significant limitations.
The problem with spike aerators is displacement rather than removal. In heavy clay soil, spikes push soil sideways, potentially increasing compaction around each hole rather than relieving it. The short-term oxygen boost doesn’t translate to lasting structural improvement.
Spike aeration is appropriate only for lighter, loamy or sandy soils with minor compaction issues, or as a temporary measure when plug aeration equipment is unavailable. It’s better than nothing on already loose soils that just need surface openings for water penetration.
Don’t rely on aerator sandals or short spikes for serious compaction problems. Penetration depth is often insufficient to reach grass roots below the first couple of inches, and the compaction created sideways can worsen conditions over time.
Slice Aeration
Slice aerators use rotating blades or knives to cut narrow slits into the soil and turf without removing cores. This approach reduces surface disruption—no visible plugs litter the lawn—while still opening the soil for water and nutrient penetration.
Slicing works particularly well for overseeding because seeds fall directly into the grooves and gain better seed-to-soil contact. The clean cuts create excellent germination sites without the scattered appearance of core aeration.
However, slicing is not as effective as core aeration at relieving deep compaction in heavy clay. Without soil removal, density remains largely unchanged even though surface access improves.
If your main issue is heavy clay compaction, choose core aeration first. Use slicing to enhance overseeding on fairly healthy lawns where compaction isn’t the primary concern.
Liquid Aeration Products
Liquid aeration uses sprayed soil conditioners—often containing surfactants, humic acids, or biological additives—intended to improve soil structure gradually over time. These products work differently than mechanical methods.
Liquid treatments don’t physically remove soil or create visible holes. They’re not an instant solution for severe compaction. Instead, they aim to enhance microbial activity and improve soil chemistry over multiple applications.
Position liquid products as supplemental to mechanical aeration rather than a replacement. They’re useful for ongoing soil health and can support thatch breakdown between core aeration seasons, but they won’t address serious compaction alone.
Multiple applications over months or seasons are typically required to see benefits, and results vary with soil type and product quality. Follow label directions carefully and combine liquid treatments with proper mowing height, fertilization, and organic matter additions for best results.
How to Aerate Your Lawn Step by Step
This section provides a practical, numbered walk-through for homeowners renting or using a core aerator on a typical residential yard. The focus is on plug aeration since it’s most effective for compacted home lawns.
Safety and preparation maximize results from your time and rental investment. Heavy walk-behind aerators require careful handling, and knowing where irrigation lines and cables run prevents costly damage.
Step 1: Prepare the Lawn
Complete these tasks in the 24 to 48 hours before aeration day:
- Mow shorter than usual: Cut to about one to one-and-a-half inches for cool-season grass, or just below normal height for warm-season types. Bag clippings if grass is long.
- Water the lawn: Apply about half an inch of water the day before so soil is moist enough for tines to penetrate but not muddy or squishy underfoot.
- Mark obstacles: Flag shallow irrigation heads, valve boxes, invisible dog fence wires, and landscape lighting cables to avoid equipment damage; consider scheduling expert irrigation services for healthy, lush lawns if your system needs inspection or repair.
- Remove debris: Rake up sticks, stones, or thick leaf layers that could interfere with the aerator’s path.
- Check rental logistics: Confirm pickup time and transportation—most core aerators require a truck or trailer.
Step 2: Operate the Aerator
- Start the machine on a flat, open area of the lawn.
- Engage the tines following the manufacturer’s instructions, then walk at a steady pace, letting the machine do the work rather than forcing it forward.
- Overlap passes slightly and make at least two passes in different directions—lengthwise, then crosswise—in high-traffic or visibly compacted areas. This creates sufficient hole density for meaningful compaction relief.
- Avoid turning sharply with the tines engaged, as this can tear turf. Lift the tines or disengage before making tight turns at lawn edges or around obstacles.
- Start with an open, less important section of the yard so you can get comfortable with the machine before working near flowerbeds, hardscape edges, or areas where precision matters.
Step 3: Focus on Problem Areas
Spend extra time and effort on trouble spots where compaction is most severe:
- Worn play areas: Three to four passes at different angles near playsets and trampolines
- Pet paths: Concentrate on fence lines and routes between gates where dogs run daily
- High-traffic corners: Areas near sidewalks, driveways, and where mowers repeatedly turn
- Low spots: Zones prone to puddling benefit from intensive aeration to improve drainage
Walk the yard before starting and mentally map where to concentrate your effort. The goal is higher hole density in problem areas while still treating the entire lawn adequately.
Steep slopes, shaded zones with moss issues, and areas under large trees also warrant extra attention during the aeration process.
What to Do After Aeration
The hours and days immediately following aeration represent prime time to add seed, fertilizer, and amendments, especially when you pair the work with the best products for lawn care to support recovery. Open holes maximize contact with the soil, dramatically improving the effectiveness of these treatments.
Post-aeration care can significantly increase the benefits of your work, leading to thicker turf, fewer bare spots, and improved soil structure over the next growing season.
Leave soil plugs on the lawn surface. They’ll dry and crumble naturally over one to two weeks with mowing and rain, recycling organic matter and beneficial microbes. If you dislike the appearance, lightly break up plugs with a rake or drag mat after they dry—but don’t remove them from the yard.
Overseeding and Fertilizing
Aeration creates ideal conditions for overseeding thin or patchy lawns. Seeds fall into aeration holes and make direct contact with soil rather than sitting on thatch where they often fail to germinate. Research shows germination rates can be 20 to 40% higher on aerated surfaces.
Choose high-quality seed matched to your existing grass type and climate—turf-type tall fescue blends work well for many cool season lawns, while certified Bermuda seed suits warm regions. If you’re unsure what to plant, focus on selecting the ideal grass for your lawn based on climate, sun exposure, and maintenance needs.
Apply starter fertilizer for new seedings or a balanced slow-release lawn fertilizer immediately after seeding, following label rates and local regulations. The open soil readily accepts nutrients, directing them to the root zone where they’re most effective.
Avoid using weed-and-feed products or pre-emergent herbicides at the same time as overseeding. These products prevent seed germination, defeating the purpose of your overseeding effort.
For cool-season lawns, overseeding in early fall after aeration takes advantage of favorable soil temperatures and reduced weed competition heading into cooler weather.
Topdressing and Soil Improvement
Applying a thin layer of screened compost or high-quality topsoil—about a quarter inch—after aeration significantly improves poor or clay-heavy soils over time. This organic matter fills aeration holes and begins building better soil structure.
To spread compost, use a shovel to fling small amounts across the lawn or employ a specialized topdresser if available. Gently rake to work material into cores and holes without smothering grass.
Keep topdressing light enough that grass blades remain mostly visible. You’re dusting the surface, not burying it. Heavy applications can suffocate turf and create more problems than they solve.
Repeat light compost topdressing after aeration every year or two as a long-term strategy for building soil structure and microbial activity. Over several seasons, this practice transforms even heavy clay into more workable, well-draining soil.
Watering and Early Care
Water lightly but frequently for the first one to two weeks after aeration and overseeding. Keep the top inch of soil consistently moist—not saturated—to support seed germination. This may mean brief daily watering during dry weather.
Once new grass establishes, transition to deeper, less frequent irrigation. Aim for about one inch of total water per week from rain and irrigation combined, allowing water to penetrate deep into the root zone.
Avoid heavy foot traffic, sports play, or very short mowing on newly aerated and seeded lawns for the first couple of weeks. Roots need time to settle, and freshly loosened soil compacts easily under pressure.
Resume mowing at normal schedules once new seedlings reach three to four inches tall. Use sharp blades and follow the one-third rule—never removing more than one-third of blade height—to minimize stress on recovering turf.
Cost, DIY vs. Professional Aeration
Homeowners face a choice between renting equipment for DIY aeration or hiring a lawn service to handle the job. Understanding typical costs helps you budget appropriately for a standard suburban yard.
Professional aeration for an average-sized residential lawn often falls in the range of $75 to $200, depending on lawn size and regional pricing. DIY rental costs less but requires your labor, transportation, and time.
The right choice depends on lawn size, physical ability, available time, and whether you already own compatible equipment. Both approaches can produce excellent results when done correctly.
Equipment Rental and DIY Costs
| Cost Factor | Typical Range |
|---|---|
| Walk-behind aerator rental (day) | $50–$100 |
| Fuel | $5–$15 |
| Truck/trailer rental (if needed) | $30–$75 |
| Hand aerator purchase | $30–$60 |
Hand aerators and smaller homeowner models cost less but require significantly more labor. They’re practical only for small yards or specific problem areas rather than treating entire large lawns efficiently.
Hidden costs include transport (truck or trailer if you don’t own one), time required to pick up, use, clean, and return the machine same-day, and physical effort operating heavy equipment. Many homeowners instead pair aeration with a professional spring cleanup service in Northern Virginia to handle debris removal and seasonal prep together.
Neighbors with similar lawn sizes can split rental costs by sharing equipment on the same weekend. Coordinate schedules in advance to maximize rental value while keeping individual costs manageable.
When to Consider a Professional
Hiring a lawn care professional makes sense in several situations:
- Very large lawns exceeding half an acre
- Steep slopes requiring specialized equipment
- Limited physical ability to operate heavy machines
- Time constraints during busy seasons
- Desire to bundle aeration with overseeding and fertilization
Professionals typically use heavier, commercial-grade core aerators that produce more holes per square foot in less time than small rental machines. This efficiency translates to more thorough treatment.
A reputable service should explain their process, timing, and exactly what’s included—number of passes, whether overseeding is part of the package, and cleanup expectations.
Schedule professional aeration several weeks before your ideal seasonal window fills up, especially for popular fall dates in September when demand peaks, and look into dedicated lawn aeration service in Manassas, VA if you’re in Northern Virginia.
Ask about lawn preparation requirements before the service arrives: mowing height, watering the day before, and marking irrigation heads and utilities. Proper prep ensures the best possible results from professional treatment.
Frequently Asked Questions
This section addresses common questions about lawn aeration that homeowners frequently encounter, covering special situations and practical concerns beyond the main topics already discussed.
Can I aerate a newly seeded or newly sodded lawn?
Wait at least one full growing season before aerating newly seeded lawns and at least six to twelve months for new sod, depending on root establishment and your climate. Aerating too early disturbs young roots, can pull up sections of sod, or damages newly sprouted seedlings.
Check that turf is firmly rooted—it shouldn’t lift easily when tugged—and has been mowed multiple times before scheduling the first aeration. Gentle topdressing and proper watering are safer ways to improve soil for very young lawns until they’re mature enough for core treatment.
Will aeration alone fix poor drainage or standing water?
While aeration improves surface infiltration and helps minor puddling, it won’t cure serious drainage issues caused by grading problems, buried debris, or high water tables. Persistent standing water after normal rainfall may require regrading, adding drains, or building up low spots.
Use aeration as part of a broader strategy: combine core treatment, compost topdressing, and possible landscape changes to improve long-term drainage. Observe how long water lingers after several rains post-aeration to judge whether further work is needed.
Is it okay to aerate a lawn with lots of weeds?
Aeration can temporarily open space where both grass and weed seeds may germinate, so timing and weed control strategy matter. Focus first on getting basic fertility and mowing height correct, then combine aeration with overseeding desirable grass to help the lawn outcompete weeds.
Pre-emergent herbicides and overseeding often conflict, so plan weed prevention, aeration, and seeding on a seasonal calendar rather than doing everything at once. In heavily weedy lawns, multiple seasons of combined treatment may be needed to shift balance toward healthy turfgrass.
How soon will I see results after aerating my lawn?
Cosmetic results typically appear within two to four weeks during active growing seasons, especially when overseeding and fertilizing follow aeration immediately. The initial appearance of holes and plugs fades after a couple of mowings and some rainfall.
Deeper benefits—improved root systems, better drought tolerance, fewer bare spots—often become more obvious over the next one to two growing seasons. Take before-and-after photos across a season to appreciate gradual thickening and color improvements that might be easy to miss week-to-week.
Can I mow my lawn right after aeration?
Mowing can resume on its normal schedule, but avoid scalping or cutting extremely short immediately after aeration, especially if the lawn was also overseeded. Waiting a few days before the next mow gives new seed a chance to settle into holes and minimizes disturbance of loosened soil plugs.
Use sharp mower blades and follow the one-third rule to reduce stress on aerated turf. If compost or topdressing was applied, the mower may pick up some loose material on the first cut, which is normal and lessens over subsequent mowings.